Showing posts with label Montessori- Art. Show all posts

Thursday, December 20, 2012

Simple Ornament Gift

One of my favorite, but most challenging aspects of the Montessori environment is the multi-age classroom.  This is where I truly believe Montessori was a genius.  How do you help older children become caring, confident leaders?  Encourage them to interact with younger children.  How do you help younger children become more engaged, self-motivated learners?  Expose them to kindergarten-age students.
The multi-age classroom becomes a challenge, however, when planning art activities and whole group exercises.  Activities must be simple enough for the youngest three-year old, yet challenging enough to capture the attention of a six-year old.  Every year we plan a craft for the children to make as a Christmas gift for their parents.   Thanks to pinterest, I've found the perfect ornament for both three and six-year olds!  The only assistance the children needed was with controlling the proper amount of paint to be dripped into the ornament. 


Simply choose three or four colors of acrylic paint, drip them into the clear glass ornament, and shake or roll to achieve the desired effect.  We let them dry upside down on egg cartons so the extra paint could drip out.  Very easy and such beautiful gifts.


Friday, April 13, 2012

Art Show Sneak Peak


We are so excited to present our school's first ever Art Show this spring!  The children have explored so many facets of the creative arts spectrum this year.  We studied a different artist each month (see this post) and we also pulled many ideas from the Go Get Your Smock Montessori Art Curriculum.  I would say the children are eager to show their work, but actually I think we're more excited about it.  The children most certainly enjoy the process over the end product.  Oftentimes, they don't even realize we've tucked away their art for the show.  Instead, they feel fulfilled in completing the work, and satisfied to have done it on their own.

Friday, March 9, 2012

Artist of the Month

This year, we tried something new in order to introduce the children to famous artists.  We want the children to really KNOW these artists as people.  We want the children to understand why they drew or painted a certain way.  Lastly, we want the children to feel more comfortable expressing art in their own unique way.
Last summer, I stumbled across a Montessori blog (forgive me, I can't recall the source) describing "artist baskets".  I ordered the "Getting to Know the World's Greatest Artists" series by Mike Venezia.  I poured through them and found small objects relating to each artist's life.  Those objects, the "Getting to Know" book, a framed photograph of the artist, and a sample of the art, are placed in the basket for exploration and manipulation.  I'm thrilled when I overhear children's conversations near the basket, and it sounds like they're talking about a mutual friend!  Enjoy some of our experiences below:

van Gogh basket
Matisse art project

Discussion painting over snack table

Matisse basket

Picasso basket
A big thank you to my Assistant Teacher whose artistic view of the world helps to expose these young children to some of the most amazing and creative art experiences.

Sunday, January 17, 2010

Turntable Art

Here's a fun art activity that you can try at home...if you're a packrat like me.  Fortunately, I held on to this old record player from my childhood.  This is based on the "spin art" idea.  Here's what you need:
  • Record player
  • Small paper plates
  • Markers
  • Tape
  • Hole puncher (optional)
  • String (optional)
This work set up on a table, not on a shelf.  It is too heavy for some of the younger children to carry.


The child places a plate upside down on the turntable.


He then attaches two pieces of tape to the plate.


Next, he creates designs and spirals with the marker, experimenting with the two different speeds.


Use a variety of markers for more interesting designs.


Some of the children wanted to display their art, so I added a hole puncher and some string.  They were able to punch the holes, but many of them needed help tying the string.  This activiy is so much fun, be sure to have enough paper plates!

Tuesday, September 1, 2009

Budding Artists

Most Montessori teachers work hard to introduce students to Classical and Impressionistic works of art. First, we simply hang up the art in the room. Then, when a child expresses interest, we discuss the work and the child shares his thoughts. Next, we introduce the names of famous artists and the children sort artwork by artist. Personally, my students' favorites are Renoir, Seurat, Degas and Kandinsky.

However, I must admit that we generally neglect contemporary works of art. I found this great website called "Feed Your Soul- The Free Art Project" designed to introduce new works of art to a large audience. These pieces are available to download and print for free. Simply click on "downloads" to view the entire list of art. I think this one is my favorite, those owls are just so sweet:


I plan to print and frame a few to scatter around the classroom. I'm eager to discuss them with the children and even more excited to hear their conversations and critiques. I could write a book about some of the 3-year-old's conversations I've overheard. Enjoy!

Friday, August 21, 2009

Art Supplies

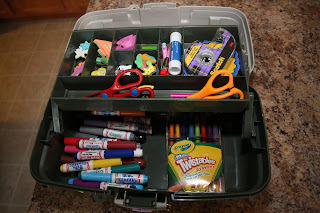
Here's a great way to keep your child's art space organized. Start with a tackle box. Fill it with your child's art supplies. Decorate it with foam stickers, or any other fun medium. You can also put your child's name in stickers across the front of the box.

Here are some items that can go in the art box:
  • scissors, craft scissors (the ones that cut designs)
  • markers, colored pencils, crayons
  • stickers
  • tape, glue stick, glue dots
  • Do-a-Dots (these are fantastic!)
  • stamps, ink
  • pencils, pens, erasers
  • scraps of paper, scraps of aluminum foil (great for rolling into beads or drawing on with markers)
  • yarn, pipe cleaners


Encourage your budding artist by helping him keep it neat. Rotate the supplies every few weeks to keep the activity fresh.

Tuesday, July 7, 2009

Messy Fun

Here's an art activity that I saw on another blog recently, but I can't remember which one. This activity was so much fun, I might try it out in the classroom this year. G mentioned that she'd like to make some more for her grandparents' birthdays, but she'd like to keep these and frame them for her room. They're so beautiful, I just might do that!


This is what you need: cookie sheet, shaving cream, food coloring, fork, cardstock, straight edge

Step One: Cover cookie sheet with shaving cream and squeeze several drops of food coloring in your color choice.

Step Two: Use a fork to swirl, not mix, colors. Plastic forks work very well.

Step Three: Lay the piece of cardstock down onto the shaving cream and press, making sure the entire paper is covered.


Step Four: Peel the paper off of the shaving cream and place on your surface.

Step Five: Use a straight edge to wipe off the excess shaving cream.


Viola! You're left with a swirly masterpiece. We re-used the same shaving cream several times and just kept adding different colors. The really neat part was seeing the colors mix and form new colors.

Try it at home! It's really not as messy as it looks. :)